
Thread Loop Creation: a miracle of sewing machine engineering
The vital importance of the checkspring: a small part that can be found on every sewing machine in the world

The more I learn about sewing machines, the more I’ve come to appreciate the miracle that is thread loop creation.
I often imagine the people who attempted to create the first sewing machine and the challenges they faced. In a sense, they were trying to something simple: create a machine that can tie a knot between two sources of thread and bind two pieces of fabric together. But, in order to tie a knot, one of the threads would have to form a loop so that the other thread could slide through said loop. This seemingly simple step is, in fact, quite complex, and it's amazing how those inventors managed to solve the problem.
The Role of the Checkspring in Thread Loop Creation
The needle thread is where the loop gets created— not the bobbin thread.
When does the loop get created?
The needle moves downward and pierces the fabric. It passes through the needle plate hole and continues its downward trajectory below the needle plate. The needle keeps moving downward until it reaches its bottommost position. It reaches its bottommost position, then begins its trajectory upward. The thread forms a loop at the eye of the needle (on the backside of the needle) after the needle has risen a few millimeters above the needle’s bottommost position.
A major key to this loop creation is that the needle thread remains taut along the needle shaft until the needle pierces the fabric. Then, after the needle pierces the fabric, the thread is given slack, which allows the loop to form at the needle eye when the needle begins its upward trajectory. Without that timing of thread tautness above the fabric, then thread slack beneath the fabric, it is very difficult to achieve good stitch quality.


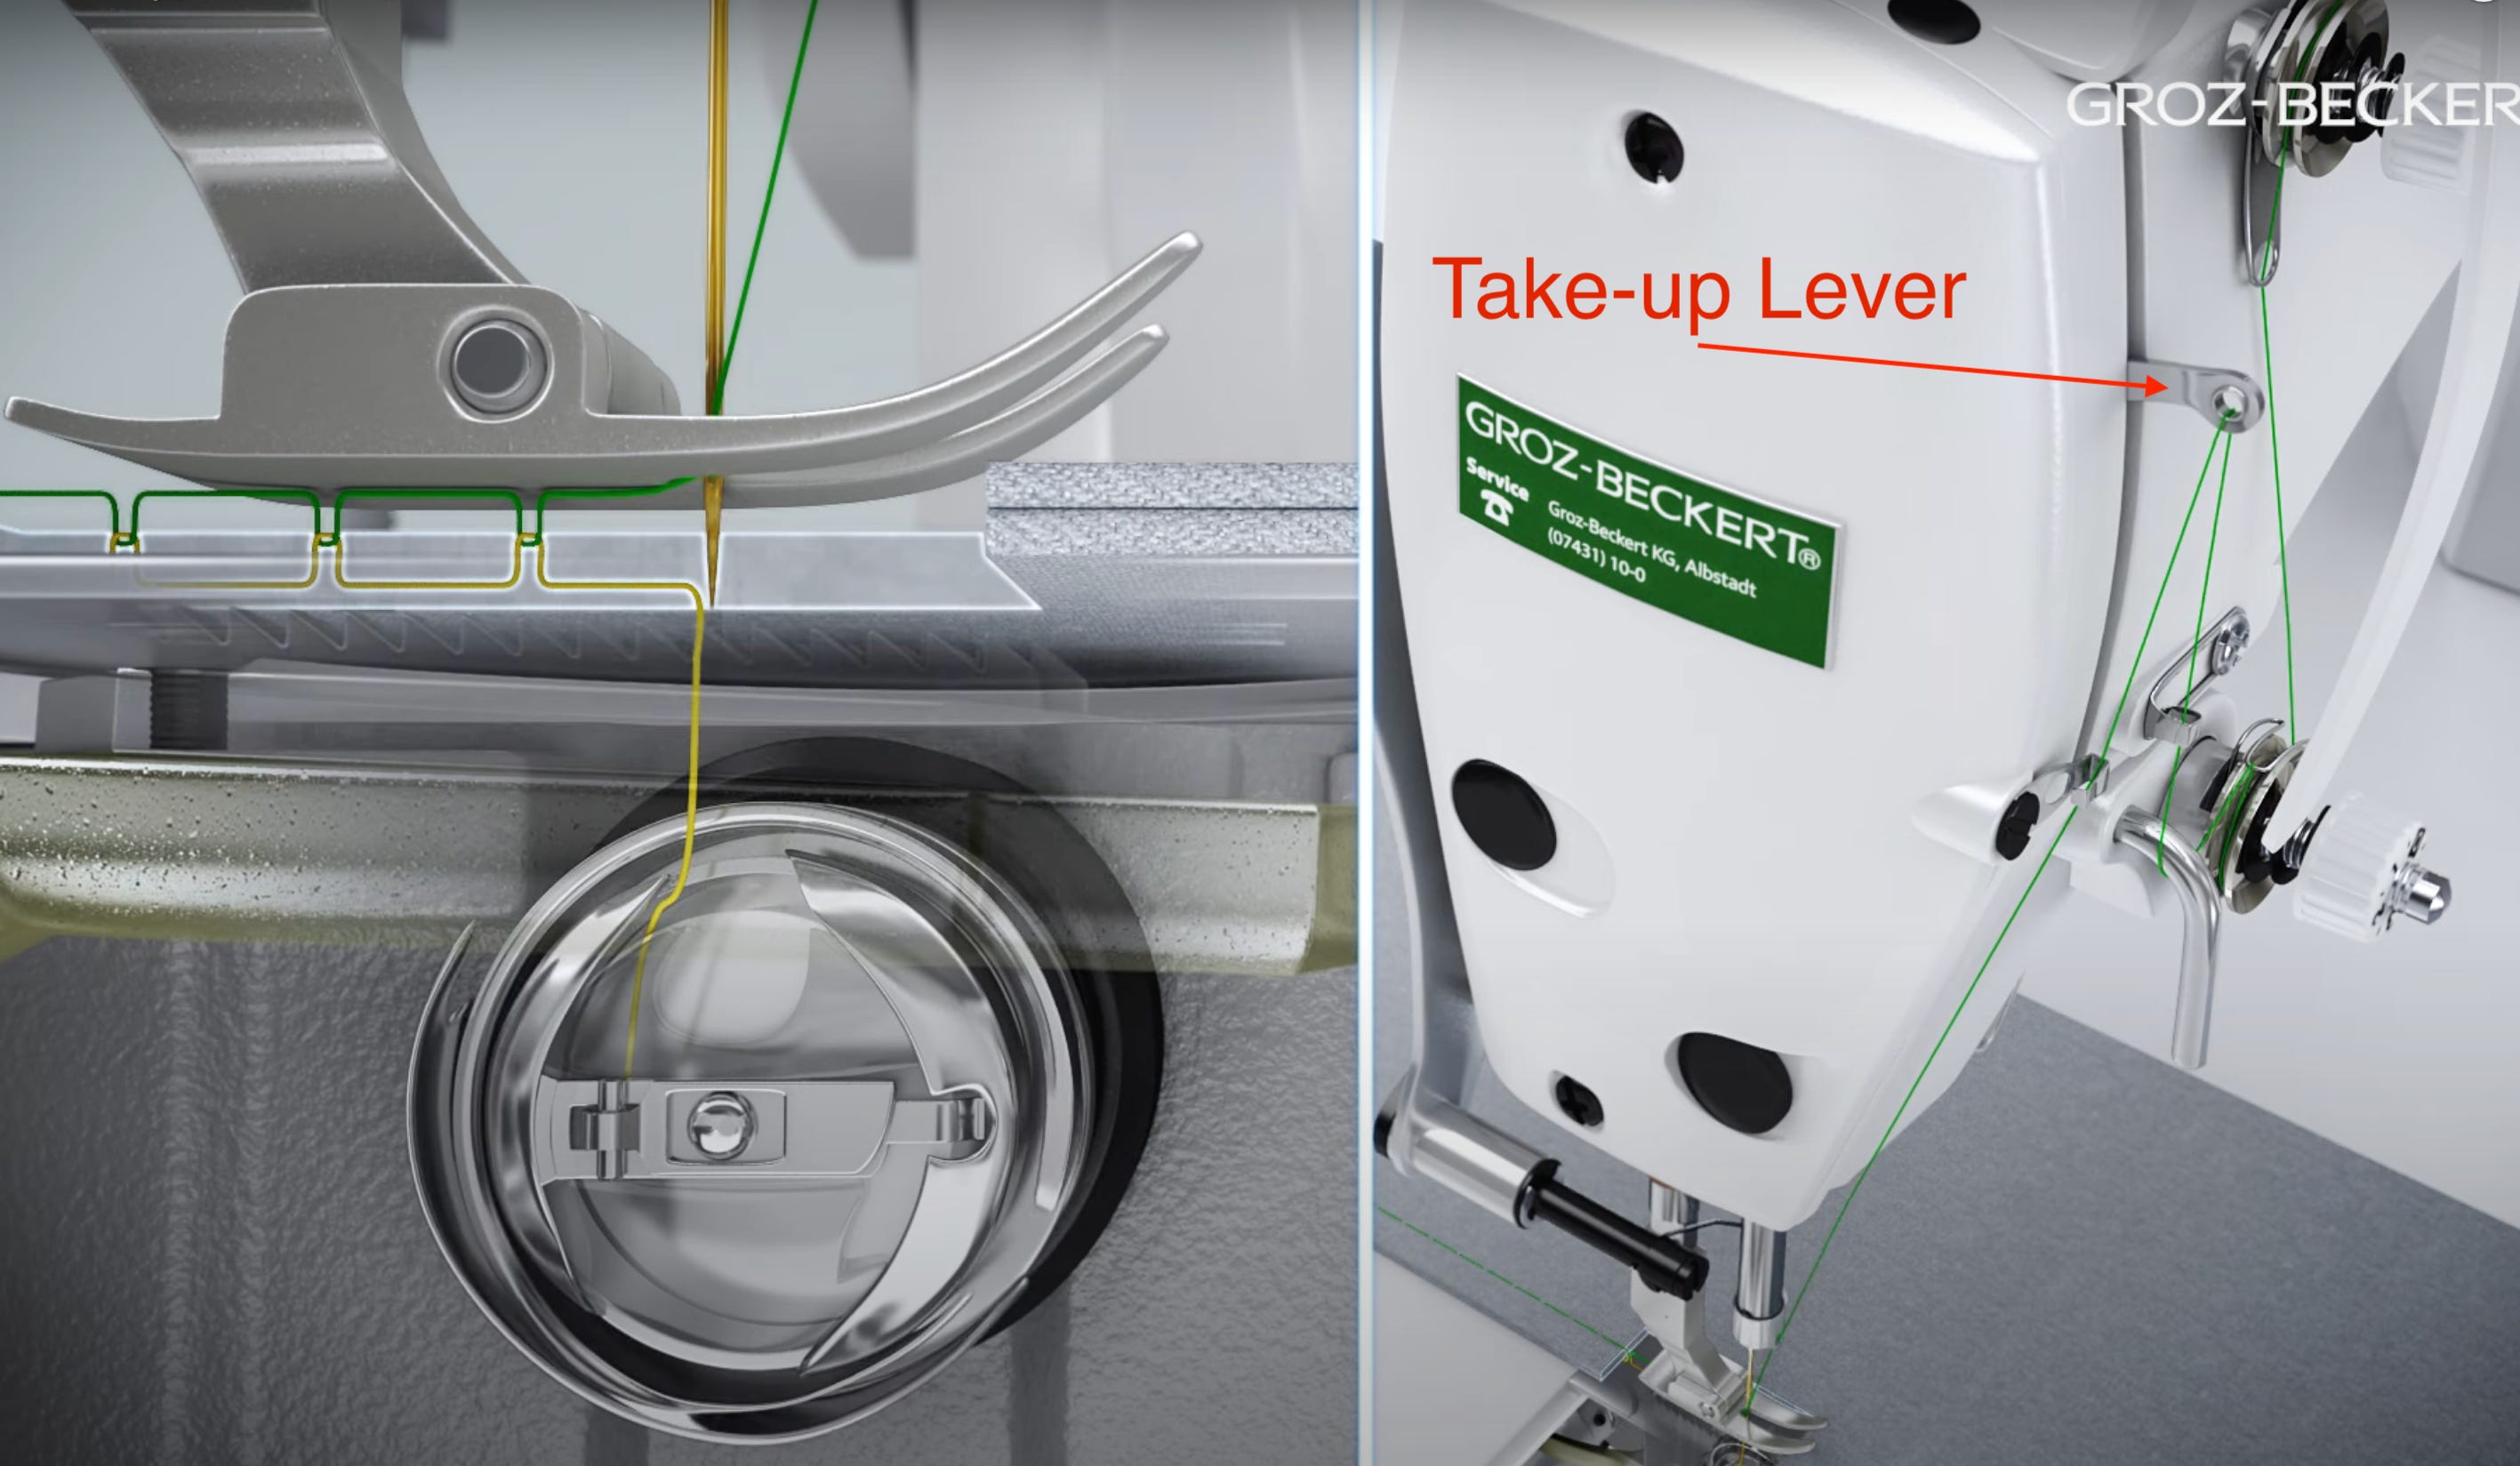
It’s not natural for the thread to remain taut above the fabric. The needle is moving up and down at high speeds, so it’s natural that they thread would also shift up and down with the movement of the needle. In addition, as the needle moves down, the take-up lever moves down, which creates slack in the needle thread prior to the needle piercing the fabric.
Sewing machine engineers had to do something in order to keep the needle thread taut prior to the needle entering the fabric. Thus, they created the checkspring, a tiny part that can be found on every sewing machine in the world.
When you thread the top half of your sewing machine, the thread goes around the checkspring. On some machines, such as the Juki TL series, you can see the checkspring on the outside of the machine around the tension discs. However, on most modern machines, the checkspring is hidden within the machine’s plastic cover

The function of the checkspring is to keep the thread taut before the needle enters the fabric, then give the thread slack after the needle enters the fabric.
Without the checkspring, the needle thread would be loose against the needle shaft, bouncing up and down as the needle moves up and down. Part of the reason the thread would be loose is because as the needle moves down, the take-up lever also moves down, giving the thread slack. Because of this thread slack, a couple different maladies could (and would) occur if it weren’t for the checkspring:
the loose needle thread could shift and get caught underneath the needle point. In such cases, the needle could pierce the needle thread, causing thread breakage and poor stitch quality
the loose needle thread would have trouble sliding through the tiny hole in the fabric (the hole pierced by the needle), in which case loops of thread would remain on the topside of the fabric.
because the loose needle thread would have trouble sliding through the tiny hole in the fabric, there is a good chance the loop would never form, leading to skipped stitches.
As you can see in the video below, the checkspring keeps the thread taut until the needle pierces the fabric. But why does it give slack to the thread once it pierces the fabric?
It gives the thread slack so that the thread can more easily form a loop. As discussed in previous articles, obstructions to the upper thread that cause thread snags lead to skip stitches because the snag essentially holds the thread tight against the needle shaft, not allowing the thread to form a loop. You need that slack at the last second, and that’s the miracle of the checkspring: it keeps the thread taut when the needle is above the fabric, then hits a stopping point (often in the form of a stop-pin) after the needle enters the fabric.
Final Notes on the Checkspring
A good sewing machine technician will make sure to observe the timing of the checkspring and make the necessary adjustments to the checkspring stop if the checkspring is not holding the thread taut until the needle enters the fabric.
The checkspring is prone to getting bent, and technician should be able to see that and replace the checkspring if necessary.
Compacted lint in the vicinity of the checkspring can impede the checkspring’s movement, which is another good reason to clean your machine of lint.
Some modern sewing machine have a sensor that tells you if your upper thread breaks. But the sensor does not sense the thread itself. Instead, it senses the movement of the metal checkspring as it bounces up and down each stitch. If the thread breaks, the checkspring stops bouncing, and the sensor knows the thread must be broken. With that said, sometimes the sensor is faulty and thinks the thread is broken when its not. In such cases, this faulty sensor is often causes by compacted lint that impedes the movement of the checkspring. Because the lint prevents the checkspring from moving up and down, the sensor thinks the thread is broken. If you every get a faulty sensor, unthread the machine, blow out the upper half with canned air, and rethread the machine properly.
In writing this article, I consulted with my father and uncle Marty. Marty pointed out that the checkspring serves a secondary function that contributes to good stitch quality. While it is true that the checkspring provides thread slack while the needle is down below the fabric, there is a brief moment (while the needle is down below the fabric) when the checkspring re-engages and makes the thread taut again for a split second.
It’s difficult to see and happens very quickly, but you can see it happen in the video below if you look super closely. This is by design. The reason why does the checkspring re-engages to make the thread taut is because a key part of the stitch-making process is that the needle thread and bobbin travel around the hook mechanism together and form a loose knot. As the needle thread and bobbin thread travel around the hook, they need help moving back up toward the needle plate hole, where they will eventually be cinched up into the the fabric by the take-up lever. The checkspring re-engaging for that brief, brief moment provides the help they need.
Thank you for reading!
If you found this article interesting, please share it with your fellow sewists! It means a lot to me and helps aid the growth of The Sewing Machine Newsletter.
Also, feel free to leave a comment, and don’t forget to check out the archive of previous articles published over the past two years.
Thank you,
—Cale
My Favorite Vintage Sewing Machines

In this edition of The Sewing Machine Newsletter, I list a handful of my favorite vintage sewing machines, plus what you can expect from such machines and what I think is a fair price.
Substack's Burgeoning Sewing Community

This article shares a handful of Substack newsletters dedicated to sewing. These publications offer thoughtful, long-form content that informs, inspires, and strengthens the sewing community as a whole. If you're looking for a place to deepen your skills, engage with like-minded sewists, and escape the toxicity that sometimes plagues other online spaces, these newsletters are the perfect antidote.
"Sewing Machine Almost Kill Me and Sewing Machine Save My Life"

In July 2023 I took a trip to New York to visit some friends who live on Long Island. I took the train into Manhattan several times, and on one occasion I made a point to visit the Garment Worker statue on 7th Avenue. That's when I met Efim Tarakhovskaya, my friend and a fellow Sewing Machine Man. Here is his incredible story...
thank you Cale for the sewing machine newsletter,I find it very interesting and look forward to each letter, I now understand how my machine operates. I can tell you are very passionate about your trade. Wanda (Australia)
You make me realize how very little I knew about how a sewing machine works. Thank you for your continuing education class.😊Karen